


Overview
In a Linux environment, we examine the underlying operating principles of umask, which determines default access permissions for newly created files and directories. From octal calculation methods to shared directory permission control and persistent configuration via shell profiles, this guide covers essential management techniques ready for production use.
1. Checking the Current umask and Testing Default File and Directory Creation Permissions
Execute the mkdir -p /tmp/umask-lab && cd /tmp/umask-lab command to create and move into a dedicated practice directory for testing umask settings and permissions.

The umask command checks and sets the mask value that restricts default access permissions for newly created files and directories.
The output shows that the default mask value for the current session is set to 0022.
⚙️ [Key Options]
-S : Displays the mask value in an intuitive symbolic mode (u=rwx,g=rx,o=rx) showing allowed permissions rather than numbers.-p : Prints the current mask setting in an octal umask command format that can be reused.

Running the umask -S command allows you to view the actual permissions granted to user (u), group (g), and others (o) in an intuitive symbolic mode according to the currently applied mask.
The output u=rwx,g=rx,o=rx indicates that the owner is granted read, write, and execute permissions by default, while the group and others are granted read and execute permissions.

With the current umask value (0022) applied, run touch default_file.txt && mkdir default_dir to create a new file and directory in order to check default creation permissions.

Run the ls -ld default_file.txt default_dir command to check the actual permissions of the created file and directory.
You can confirm that the directory is created as 755 (drwxr-xr-x) after masking 022 from the maximum default directory permissions of 777, while the regular file is created as 644 (-rw-r--r--) after masking 022 from the maximum default file permissions of 666 (which excludes execute permission).

2. Practical Permission Control on New Files via Temporary umask Modification
Run the mkdir -p /tmp/umask-lab && cd /tmp/umask-lab command to verify and navigate to the dedicated workspace for hands-on practice.

Execute the umask 027 command to temporarily change the mask value of the current session to 027.
This setting restricts write permission for group users and completely blocks read, write, and execute permissions for others.

To verify that the changed umask value (027) is properly applied to newly created items, create a test file and directory using the touch secure_file.txt && mkdir secure_dir command.

Execute the ls -ld secure_file.txt secure_dir command to check the actual permissions of the created file and directory.
The output lets you review the detailed permission states and ownership information of the directory and file.

After completing the permission control test, restore the session mask setting back to its standard default state by executing the umask 022 command.

3. Shared Directory umask Configuration for Team Collaboration and Web Server Environments
Execute the mkdir -p /tmp/umask-lab/shared && cd /tmp/umask-lab command to create a shared directory for team collaboration and joint work, then move to the working path.

To ensure seamless collaboration among group members by retaining group write permission, execute the umask 002 command to modify the mask value of the current session.
This configuration only restricts write permissions for others from the base permissions, allowing both read and write permissions for both the owner and the group.

With the changed umask value (002) applied, run touch shared/team_doc.txt && mkdir shared/team_project to create collaboration files and directories.

Execute the ls -ld shared/team_doc.txt shared/team_project command to inspect the actual permissions of the created file and directory.
From the output, you can inspect the detailed permission state and ownership information for each item created inside the shared directory.

After finishing the collaboration environment test, revert the session mask setting to its standard security default by running the umask 022 command.

4. Making umask Persistent System-Wide and Per-User
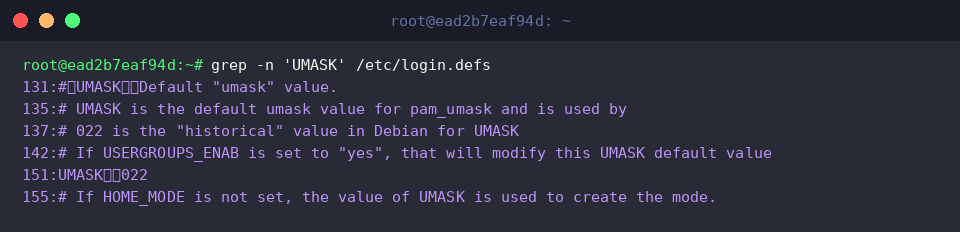
Execute the grep -n 'UMASK' /etc/login.defs command to check the system-wide default umask setting.
From the output, you can confirm that UMASK 022 is defined on line 151 as the system default.
Run the echo '# Custom user umask' >> ~/.bashrc command to add a comment designating this as a personal user setting.

Add the configuration by executing the echo 'umask 027' >> ~/.bashrc command so that custom user permissions are automatically applied every time a new shell session starts.

Run the tail -n 2 ~/.bashrc command to verify that the umask-related settings were successfully added to the end of the ~/.bashrc file.
The output confirms that the comment and the umask 027 directive are correctly reflected in the last two lines of the file.

Execute the bash -c 'source ~/.bashrc && umask' command to apply the modified ~/.bashrc configuration and verify the final mask value.
The output shows the current mask state applied in that shell environment.

We have covered the core concepts and practical configuration methods for umask, which automatically controls file and directory creation permissions in Linux.
Apply the right umask values tailored to your operating environment and security policies to achieve secure and systematic system administration.